If you work a lot with containers, then there’s a good chance you’ve wanted to look inside a running container’s filesystem at some point. Maybe the container is failing to run properly and you want to read some logs, maybe you want to check some configuration files inside the container...or maybe you’re like me and want to place some eBPF probes on the binaries in that container (more on this later).
No matter the reason, in this post, we’ll cover a few methods you can use to inspect the files inside a container.
We’ll start with the easy and commonly recommended ways of exploring a container’s filesystem, and talk about why they don’t always work. We’ll follow that up with a basic understanding of how container filesystems are managed by the Linux kernel, and we’ll use that understanding to inspect the filesystem in different, but still easy, ways.
If you perform a quick search on how to inspect a container’s filesystem, a common solution you’ll find is to use the Docker command ([1], [2]):
docker exec -it mycontainer /bin/bash
This is a great way to start. And if it works for all your needs, you should continue using it.
One downside of this approach, however, is that it requires a shell to be present inside the container. If no /bin/bash, /bin/sh or other shell is present inside the container, then this approach won’t work. Many of the containers we build for the Pixie project, for example, are based on distroless and don’t have a shell included to keep image sizes small. In those cases, this approach doesn’t work.
Even if a shell is available, you won’t have access to all the tools you’re used to. So if there’s no grep installed inside the container, then you also won’t have access to grep. That’s another reason to look for something better.
If you get a little more advanced, you’ll realize that container processes are just like other processes on the Linux host, only running inside a namespace to keep them isolated from the rest of the system.
So you could use the nsenter command to enter the namespace of the target container, using something like this:
# Get the host PID of the process in the containerPID=$(docker container inspect mycontainer | jq '.[0].State.Pid')# Use nsenter to go into the container’s mount namespace.sudo nsenter -m -t $PID /bin/bash
This enters the mount (-m) namespace of the target process (-t $PID), and runs /bin/bash. Entering the mount namespace essentially means we get the view of the filesystem that the container sees.
This approach may seem more promising than the docker exec approach, but runs into a similar issue: it requires /bin/bash (or some other shell) to be in the target container. If we were entering anything other than the mount namespace, we could still access the files on the host, but because we’re entering the mount namespace before executing /bin/bash (or other shell), we’re out of luck if there’s no shell inside the mount namespace.
A different approach to the problem is simply to copy the relevant files to the host, and then work with the copy.
To copy selected files from a running container, you can use:
docker cp mycontainer:/path/to/file file
It's also possible to snapshot the entire filesystem with:
docker export mycontainer -o container_fs.tar
These commands give you the ability to inspect the files, and are a big improvement over first two methods when the container may not have a shell or the tools you need.
The copy method solves a lot of our issues, but what if you are trying to monitor a log file? Or what if you're trying to deploy an eBPF probe to a file inside the container? In these cases copying doesn't work.
We’d really like to access the container’s filesystem directly from the host. The container’s files should be somewhere on the host's filesystem, but where?
Docker's inspect command has a clue for us:
docker container inspect mycontainer | jq '.[0].GraphDriver'
Which gives us:
{"Data": {"LowerDir": "/var/lib/docker/overlay2/63ec1a08b063c0226141a9071b5df7958880aae6be5dc9870a279a13ff7134ab-init/diff:/var/lib/docker/overlay2/524a0d000817a3c20c5d32b79c6153aea545ced8eed7b78ca25e0d74c97efc0d/diff","MergedDir": "/var/lib/docker/overlay2/63ec1a08b063c0226141a9071b5df7958880aae6be5dc9870a279a13ff7134ab/merged","UpperDir": "/var/lib/docker/overlay2/63ec1a08b063c0226141a9071b5df7958880aae6be5dc9870a279a13ff7134ab/diff","WorkDir": "/var/lib/docker/overlay2/63ec1a08b063c0226141a9071b5df7958880aae6be5dc9870a279a13ff7134ab/work"},"Name": "overlay2"}
Let’s break this down:
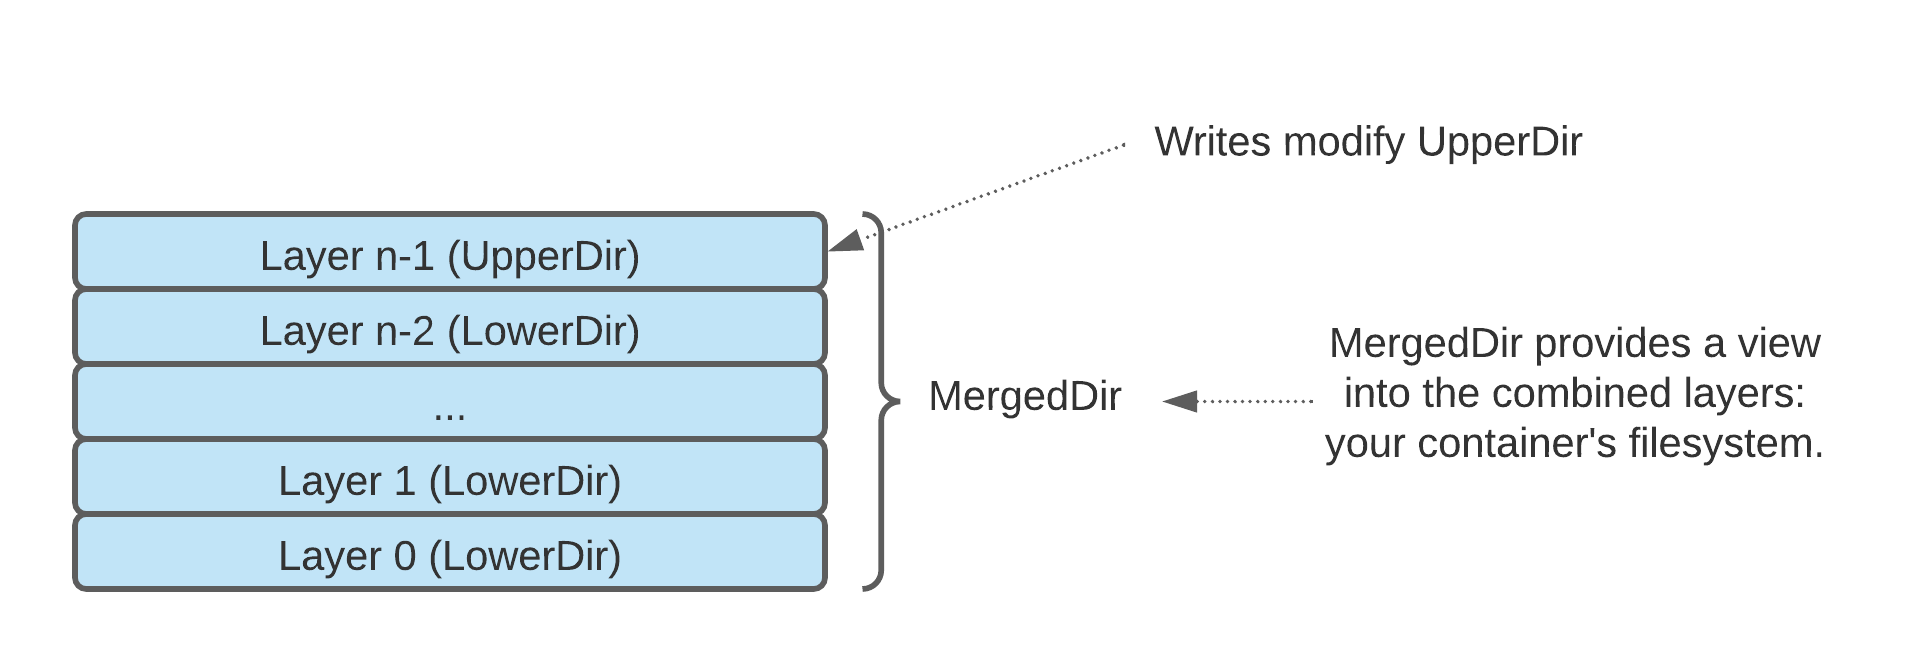
LowerDir: Includes the filesystems of all the layers inside the container except the last oneUpperDir: The filesystem of the top-most layer of the container. This is also where any run-time modifications are reflected.MergedDir: A combined view of all the layers of the filesystem.WorkDir: An internal working directory used to manage the filesystem.

Structure of container filesystems based on overlayfs.
So to see the files inside our container, we simply need to look at the MergedDir path.
sudo ls /var/lib/docker/overlay2/63ec1a08b063c0226141a9071b5df7958880aae6be5dc9870a279a13ff7134ab/merged
If you want to learn in more detail how the filesystem works, you can check out this excellent blog post on the overlay filesystem by Martin Heinz: https://martinheinz.dev/blog/44.
Saving the best for last, there’s an even easier way to find the container’s filesystem from the host. Using the host PID of a process inside the container, you can simply run:
sudo ls /proc/<pid>/root
Linux has taken care of giving you a view into the mount namespace of the process.
At this point, you’re probably thinking: why didn’t we just lead with this approach and make it a one-line blog post...but it’s all about the journey, right?
For the curious, all the information about the container’s overlay filesystem discussed in Method 4 can also be discovered directly from the Linux /proc filesystem. If you simply look at /proc/<pid>/mountinfo, you’ll see something like this:
2363 1470 0:90 / / rw,relatime master:91 - overlay overlay rw,lowerdir=/var/lib/docker/overlay2/l/YZVAVZS6HYQHLGEPJHZSWTJ4ZU:/var/lib/docker/overlay2/l/ZYW5O24UWWKAUH6UW7K2DGV3PB,upperdir=/var/lib/docker/overlay2/63ec1a08b063c0226141a9071b5df7958880aae6be5dc9870a279a13ff7134ab/diff,workdir=/var/lib/docker/overlay2/63ec1a08b063c0226141a9071b5df7958880aae6be5dc9870a279a13ff7134ab/work2364 2363 0:93 / /proc rw,nosuid,nodev,noexec,relatime - proc proc rw2365 2363 0:94 / /dev rw,nosuid - tmpfs tmpfs rw,size=65536k,mode=755,inode64…
Here you can see that the container has mounted an overlay filesystem as its root. It also reports the same type of information that docker inspect reports, including the LowerDir and UpperDir of the container’s filesystem. It’s not directly showing the MergedDir, but you can just take the UpperDir and change diff to merged, and you have a view into the filesystem of the container.
At the beginning of this blog, I mentioned how the Pixie project needs to place eBPF probes on containers. Why and how?
The Stirling module inside Pixie is responsible for collecting observability data. Being k8s-native, a lot of the data that is collected comes from applications running in containers. Stirling also uses eBPF probes to gather data from the processes it monitors. For example, Stirling deploys eBPF probes on OpenSSL to trace encrypted messages (see the SSL tracing blog if you want more details on that).
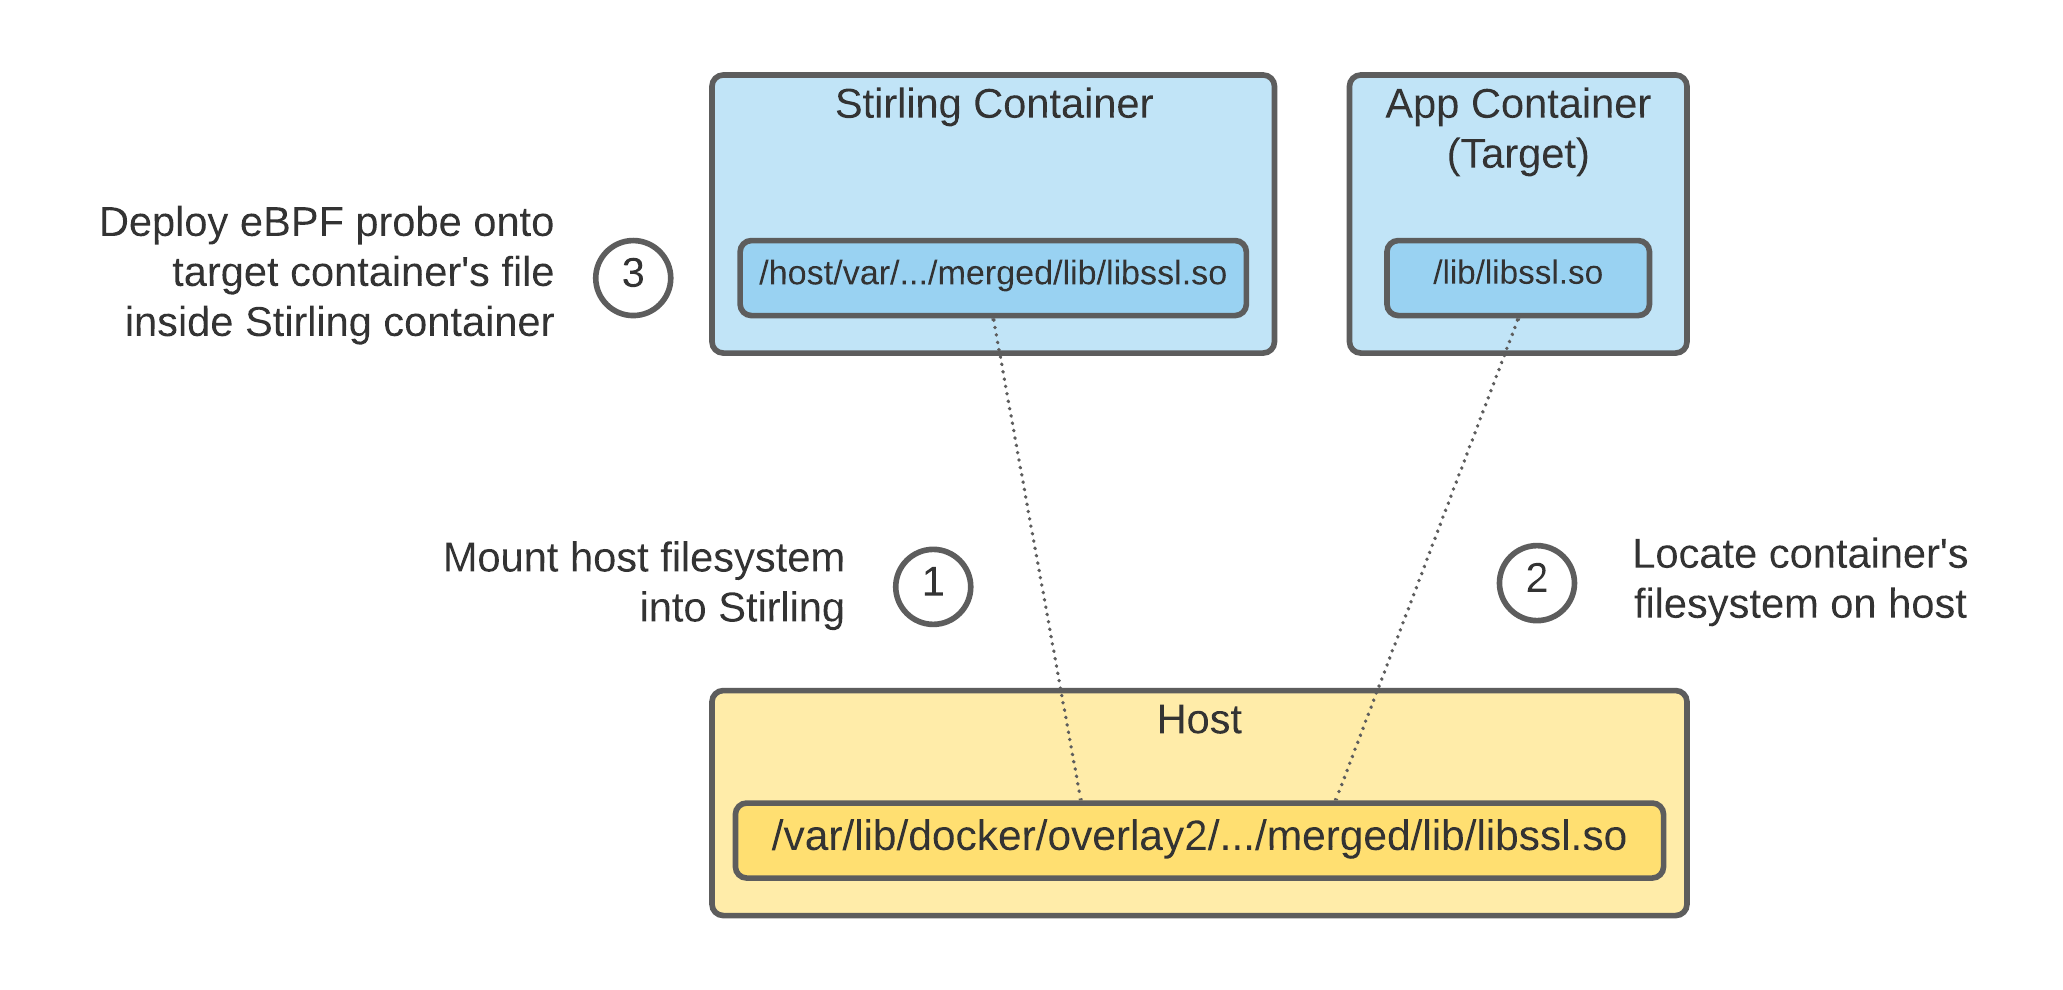
Since each container bundles its own OpenSSL and other libraries, any eBPF probes Stirling deploys must be on the files inside the container. For this reason, Stirling uses the techniques discussed in this blog to find the libraries of interest inside the K8s containers, and then deploys eBPF probes on those binaries from the host.
The diagram below shows an overview of how the deployment of eBPF probes in another container works.

Stirling deploys eBPF probes on other containers by mounting the host filesystem, and then finding the target container filesystem on the host.
The next time you need to inspect the files inside your container, hopefully you’ll give some of these techniques a shot. Once you experience the freedom of no longer being restricted by your container’s shell, you might never go back. And all it takes is a simple access to /proc/<pid>/root!
Terms of Service|Privacy Policy
We are a Cloud Native Computing Foundation sandbox project.
Pixie was originally created and contributed by New Relic, Inc.
Copyright © 2018 - The Pixie Authors. All Rights Reserved. | Content distributed under CC BY 4.0.
The Linux Foundation has registered trademarks and uses trademarks. For a list of trademarks of The Linux Foundation, please see our Trademark Usage Page.
Pixie was originally created and contributed by New Relic, Inc.


